Okay, let’s talk about this V-Rod project I tackled. It’s been a ride, literally.
Getting Started – The Teardown
So, I got my hands on this V-Rod. Stock standard, you know the look. Solid bike, sure, but not quite me. The first thing, always the first thing, is taking stuff off. You gotta see what you’re really working with. I grabbed my tools and started pulling things apart. Seat came off first, then the airbox cover – that big thing people mistake for the tank. Fenders, front and rear, got those off too. The stock exhaust system? Heavy beast. That had to go immediately. Headlight, handlebars, controls… pretty soon I had a rolling frame and engine, and a big pile of parts on the floor.
Wheels and Stance
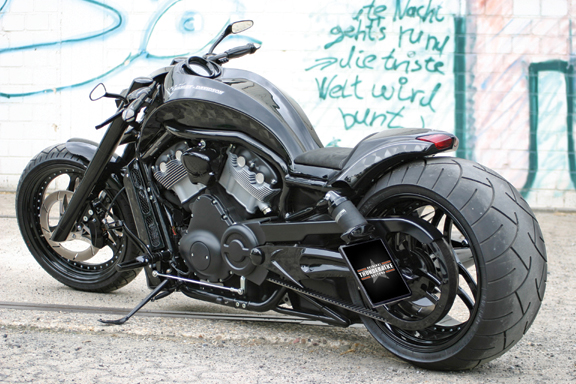
One thing I knew for sure was the wheels needed changing. Stock wheels are okay, but custom means custom. I spent a good while looking around, finally settled on a wider setup for the rear. Getting that fat tire look was key. This wasn’t just bolt-off, bolt-on. Had to check clearances, maybe modify the swingarm slightly – can’t remember exactly, just know it took some fiddling. The front wheel matched the style, of course. Getting the new wheels on, with new tires, already changed the bike’s whole attitude. Lowered it a bit too, front and rear, just to get that aggressive stance.
Controls and Comfort (Sort Of)
Next up was the front end. Hated the stock handlebars. Too cruiser-ish for the look I wanted. Went for some drag bars. Lower, meaner. This meant new cables, new brake lines, because the stock ones were suddenly the wrong length. Routing those neatly always takes more time than you think. Changed the grips and levers too, just for a better feel and look. Foot controls got moved forward a bit. Not crazy forward controls, just enough to stretch out slightly. Comfort wasn’t the main goal here, let’s be honest.
Engine Bling and Noise
The Revolution engine is already a looker, but I wanted to clean it up. Got rid of some plastic covers. Polished some bits. The big change here was the exhaust. After taking the stock boat anchor off, I fitted a much meaner, louder aftermarket system. Yeah, it’s loud. Maybe too loud for some folks, but it sounds incredible. Had to sort out the fueling too, went with a fuel tuner to make sure the engine ran right with the new pipes and better airflow. Didn’t want it running lean.
Paint and Finishing Touches
With most of the hardware sorted, it was time for paint. All those parts I took off earlier? Sent them out. Went for a deep black, mostly matte finish but with some gloss black details just to break it up. Nothing too flashy, just clean and dark. While stuff was at paint, I tidied up the wiring as much as possible. Hate seeing messy wires. Replaced some bolts with nicer looking ones. Little things make a difference.
- Key changes:
- Wider rear wheel & matching front
- Lowered suspension
- Drag handlebars
- New cables & lines
- Forward controls (slightly)
- Aftermarket exhaust
- Fuel tuner
- Custom paint job (mostly matte black)
- General cleanup and tidying
Putting It All Back Together
Then came the fun part: assembly. Carefully putting all the freshly painted parts back on. Bolting on the new exhaust. Connecting the controls. It’s slow work because you don’t want to scratch anything. Seeing it come together piece by piece is incredibly satisfying though. Finally got the seat back on, filled it with fluids, checked everything over about ten times.
And that was pretty much it. Fired it up, let it warm up, took it for a spin. Felt totally different. Looked completely different. A proper custom V-Rod, built not bought, you know? Took time, cost money, definitely some headaches along the way, but seeing the final thing… yeah, worth it. Every time.