Getting Started with Seeing the Flow
So, I decided to roll up my sleeves and try out this whole Particle Image Velocimetry thing. Heard folks talking about it, how you could actually see how fluids move, not just guess. Sounded pretty neat, figured I’d give it a whirl myself.
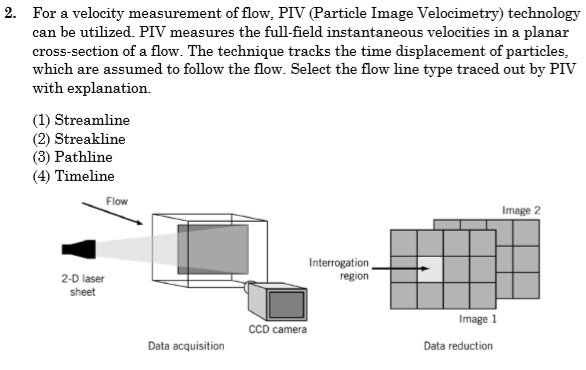
First off, I had to gather the bits and pieces. This wasn’t super straightforward. Needed a camera that could snap pictures really fast, one right after the other. And a laser, but not just any laser pointer – one that could spread its beam out into a thin sheet of light. Finding the right stuff without breaking the bank took a bit of looking around.
Setting Up the Experiment
Okay, got the gear. Now, the setup. I was looking at water flow in a small tank I rigged up. The next big step was getting those tiny particles into the water. They call it ‘seeding’. This part was messier than I thought.
- Tried some fine powder first. Clumped up. Useless.
- Then got some special tiny beads. Better, but getting them spread evenly? Tricky.
- Stirred gently, let it settle a bit. Took a few tries to get a decent amount floating around nicely.
Then came lining everything up. The laser sheet had to slice right through the part of the tank I cared about. Getting it perfectly level and aimed took some serious fiddling. Same for the camera – had to be dead-on perpendicular to the light sheet, focused just right on those tiny moving specks. Felt like I spent hours just nudging things millimeters at a time.
Timing is Everything
The real kicker? Getting the laser pulses and the camera snaps timed perfectly. The whole idea is to take two pictures extremely close together, so you can see how far the particles moved in that tiny slice of time. This meant syncing the laser flasher with the camera shutter. Had to connect them up and play with the delay settings. Lots of trial and error here.
Capturing the Images
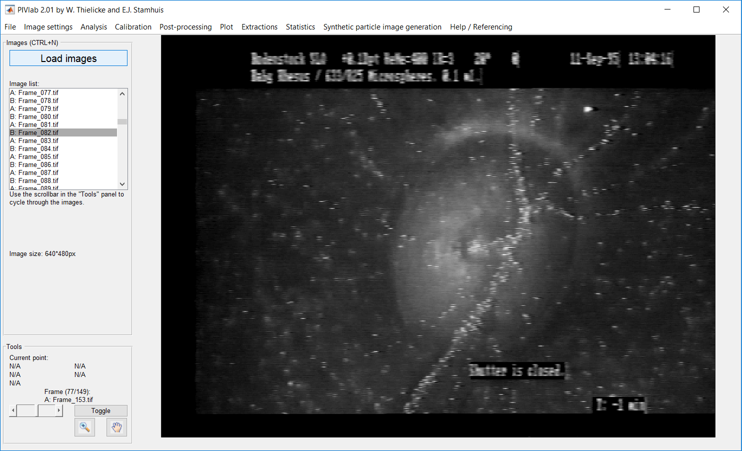
Finally, time to actually run it. Turned off the room lights, got the pump going for the water flow, fired up the laser, and started the camera sequence. Click-flash-flash-click. It takes pairs of images. Did this for a while to get a bunch of data points.
Making Sense of the Pictures
So now I had a folder full of image pairs. Just looking at them, you can kinda see specks moving, but that’s not the whole story. Needed software to do the heavy lifting. Fed the image pairs into a PIV program I found. This software basically looks at small boxes in the first picture, finds the same pattern of specks in the second picture, and calculates how far they moved.
Getting the software settings right was another learning curve. Had to tell it how big the boxes should be, how much they could overlap. Played around with these until the results started looking like actual flow and not just random arrows everywhere.
The End Result (For Now)
After all that tinkering, I actually got some velocity maps! Little arrows showing the direction and speed of the water flow in that laser sheet plane. It wasn’t perfect, definitely some weird spots, but seeing that pattern emerge from just pictures of specks? Pretty darn cool. It really gives you a different perspective on what’s happening inside a flow. Definitely a hands-on process, lots of little things to get right, but worth the effort to see it work.