So, the other day, I decided it was time to swap out the shaft on my driver. The old one just wasn’t cutting it anymore, felt a bit like a limp noodle, or maybe I was just itching for a little project. You know how it goes. It ain’t rocket science, but you gotta do it right, or you’ll be sorry.
Getting My Stuff Together
First things first, I cleared off my little workbench in the garage. Can’t have stuff rolling around and getting lost. I dug out all the bits and pieces I knew I’d need. It’s always better to have everything handy before you start making a mess. Here’s what I grabbed:
- My trusty heat gun. A hairdryer on high might work in a pinch for some folks, but a heat gun is the real deal.
- A shaft puller. Seriously, get one if you plan on doing this more than once. Saves a world of hurt.
- Some good quality epoxy. Don’t ever cheap out on the glue, man. That’s just asking for your clubhead to go flying farther than your ball.
- A new ferrule. That little plastic collar thingy.
- A fresh grip, new grip tape, and some solvent.
- A sharp utility knife.
- A bit of sandpaper.
- A shaft clamp to hold things steady is also super helpful.
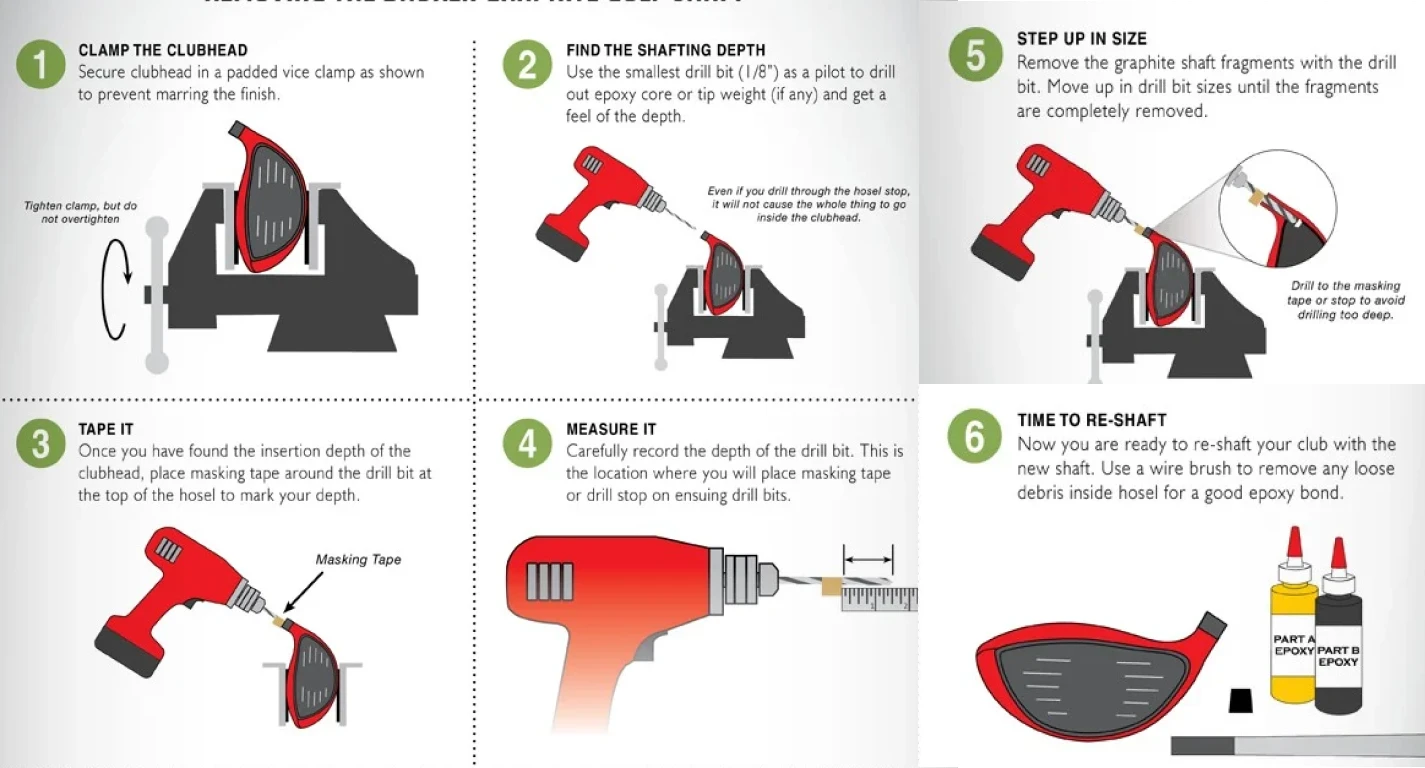
Yanking the Old Shaft Out
Alright, time to get down to business. First, I had to get that old grip off. I just took my knife and sliced it right down. No point trying to save it, it was pretty worn out anyway.
Next up was that little ferrule at the top of the hosel – that’s the part of the clubhead the shaft goes into. Sometimes a little heat makes it slide off, but this one was stubborn. I carefully scored it with the knife and popped it off. You gotta be careful not to dig into the actual clubhead material.
Then, the main event: loosening the old shaft. I fired up the heat gun, keeping it moving around the hosel. Not too hot, and not for too long! You just want to soften up that old epoxy, not melt the paint or damage the head. After a minute or so, I gave it a test.
I clamped the clubhead into my shaft puller. Applied a bit of gentle, steady pressure. Heard a little ‘pop’ – that’s the sound of success, folks. The shaft slid right out. Way easier than trying to wrestle it out by hand, believe me. I’ve seen some horror shows with people trying to twist and bang shafts out.

Clean Up and Prep for the New Stick
With the old shaft gone, I peered into the hosel. Full of old, crusty epoxy. This is a super important step: clean that crap out! If you leave it in, the new shaft won’t sit right. I used a small wire brush and a pick to get it all out until it was nice and clean inside.
Then I took my new shaft. I lightly scuffed up the tip with some sandpaper – just about an inch or so that goes into the head. This gives the new epoxy something to really bite onto. Wiped it clean with a rag afterwards.
Oh, and don’t forget the ferrule! Slipped the new ferrule onto the new shaft before I even thought about glue. Done that once, glued the shaft in and then stared at the ferrule sitting on the bench. Not fun.
Gluing it All Up
Now for the sticky part. I mixed up my two-part epoxy. Read the instructions on the package – they’re there for a reason. Mixed it real good on a piece of cardboard.
I applied a nice, even coat of epoxy all around the prepped tip of the new shaft. Some guys like to put a little inside the hosel too, which ain’t a bad idea. Then, I carefully slid the shaft into the clubhead. Gave it a little twist as it went in to make sure the epoxy spread evenly. Lined it up straight, if your driver has any alignment marks or adjustable settings you care about.
Any epoxy that squeezed out around the top of the hosel, I wiped it off quick with a rag and a bit of solvent. You want it looking clean, not like a glue monster attacked it.
The Waiting Game is Crucial
And then, the hardest part for an impatient guy like me: waiting. You gotta let that epoxy cure completely. I know the package might say a few hours, but I always give it a full 24 hours, maybe even a bit more if it’s cold. Just set it aside somewhere safe where it won’t get knocked over and forget about it. Go watch TV, mow the lawn, whatever. Don’t rush this.
Finishing Touches and Feeling Good
After a day, I checked it. Rock solid. If the shaft needed cutting to length, this is when I’d do it, but this one was already the right size for me. So, last step was putting on the new grip. Applied the double-sided tape, wet it down with solvent, and slid that new grip on. Made sure it was aligned nice and straight.
And that was that. My driver, sporting a brand-new shaft, all done by yours truly. Took it out to the range the next day. Felt good. There’s a certain satisfaction, ya know, in doing this stuff yourself. Plus, it saved me a few bucks from having the shop do it. Definitely worth the effort.